scottstuff.net
Encoding H.264 for Blackmagic Design Hyperdecks
Like a lot of people these days, I spend a huge amount of time each week on video calls for work. During the height of the pandemic, I put a fair amount of effort into video hardware in my home office, with a nice camera feeding video into a Blackmagic Design ATEM video controller and then feeding Zoom or Google Meet from it over USB. Originally I was using still photos as backdrops, but about a year ago I started a recording subtle video backgrounds to use instead of stills. Streams flowing in slow motion, landscape scenes with clouds blowing, trees subtly blowing in the wind – that sort of thing. I added a used Blackmagic HyperDeck video recorder for playing back videos that the ATEM could use as a background. I could have used a Raspberry Pi or something similar, but I decided that buying a box that Just Worked in this case was better than spending a half hour debugging the Pi every other month.
My basic workflow was pretty simple – record something, load it into DaVinci Resolve, edit it until I’m happy with it, and then export two copies. One at 4k (or higher) resolution and one as a 1080P H.264 video for the HyperDeck. Then copy the HyperDeck one onto the HyperDeck’s SD card using FTP. That worked fine – Resolve has a preset for the HyperDeck, but little problems kept creeping in. Half of my videos ended up being exported at 30 FPS and half at 29.97 FPS, for example. They both work, but the HyperDeck wants me to pick one or the other, and its list of playable videos only includes ones that match the current video mode. Every other file is invisible. So at any given time only half of my backgrounds are playable without minor tweaking. Also, it’s way too easy to accidentally export videos as 4k, which my HyperDeck can’t play, or in H.265 (ditto). There’s no error or anything – the files just aren’t visible. Plus exporting two copies from Resolve, into different directories with different filenames is generally a hassle.
If only I had a tool that coud transform a directory full of video files, skipping files that have already been transformed. Then I could just export videos from Resolve once, in whatever format makes the most sense, and have videos make their way to the HyperDeck automatically.
Let’s break this into three pieces:
- Transform the video files from whatever format I decide to export from Resolve into something that the HyperDeck can play.
- Automate transforming a whole directory’s worth of files.
- Automate getting them into the HyperDeck.
The first bit – transform video files – is a job for FFMPEG. FFMPEG is sort of the swiss army knife of video transformation. it can do almost anything, but actually finding the right mess of weird command line flags for it is a pain. It doesn’t help that the HyperDeck is very picky about video formats.
A bit of experimentation showed that using -vcodec libx264 -vprofile main -level 4.0 -r 60 -maxrate 16M -crf 23 -bufsize 32M -s 1920x1080 -acodec aac -f mov seemed to produce working files for my HyperDeck
Studio HD Mini running firmware 8.4. YMMV. I haven’t verified that
audio works with this because I’m not using audio in my files.
The second bit – transform a directory full of video files – sounds
like a job for make. Here’s a Makefile that will run ffmpeg
over all .mov or .mp4 files in the current directory and produce a
.mov file in the Hyperdeck/ subdirectory for each:
FFFLAGS=-vcodec libx264 -vprofile main -level 4.0 -r 60 -maxrate 16M -crf 23 -bufsize 32M -s 1920x1080 -acodec aac -f mov

all-src-vids := $(wildcard *.mov *.mp4)
all-hd-vids := $(patsubst %.mov,Hyperdeck/%.HD.mov, $(all-src-vids)) $(patsubst %.mp4,Hyperdeck/%.HD.mov, $(all-src-vids))

ALL: $(all-hd-vids)

Hyperdeck/%.HD.mov: %.mov
	ffmpeg -i $< ${FFFLAGS} $@

Hyperdeck/%.HD.mov: %.mp4
	ffmpeg -i $< ${FFFLAGS} $@
Now I can just run make on the command line and everything gets
re-rendered as needed. If an output file is newer than the input
file, then it won’t be re-processed. So in general rerunning make
is free, and if I find a problem with a video and re-export it from
Resolve, then make will see that the source file is now newer than
the destination and rebuild it.
Finally, there’s the issue of getting these onto the Hyperdeck. I
have a relatively small SD card on mine; I could just FTP everything
from the Hyperdeck/ subdirectory over, but eventually it’ll end up
filling up and I’ll have to do some amount of manual cleanup.
Fortunately, the latest software release for the HyperDeck includes
NAS support. I set up a guest user in Samba, exported the
Hyperdeck/ directory, and then used the screen on the HyperDeck to
select my file server and my Hyperdeck/ share. And Voila – every
properly-formatted video that gets dropped into the subdirectory is
automatically available to play with no extra steps and no worry about
disk capacity.
Since the videos are encoded at a max of 16 Mbps and the HyperDeck can pretty easily use most of 1 Gbps when writing to its SD card, it’s probably going to be okay streaming video over Ethernet. At max, it should only be 2% utilized.
Home Network, December 2023
So, I have a bit of a problem. I keep over-engineering my home network. Like, a lot. I gave some background in 2022, just before I started another round of changes, so I figure it’s time to update things a bit and explain a few of my new favorite things.
Aside: every time networking comes up, a former co-worker of mine will ask me “why do you keep doing that to yourself?” Then I kind of mumble something about servers, and multiple people working/schooling from home, and giant collections of media files (photography, videography, and years of collecting blu-rays).
But the real reason is that I enjoy it, and I really hate dealing with “regular” home networking issues. You know, the router needs rebooted before anything will connect, or there’s no connectivity in random corners of the house, or family saying “things don’t work right”, but with no data and nothing to look at to get more detail. I like redundancy and monitoring (they’re occupational hazards), and neither of those are really things that most home networking gear are good at.
So I’m mostly using 1-2 generation old enterprise hardware. It’s mostly bulletproof and it tends to sell for a few percent of its new price after it goes off of lease and ends up on eBay.
Here’s the current design, which differs quite a bit from where it was 18 months ago:
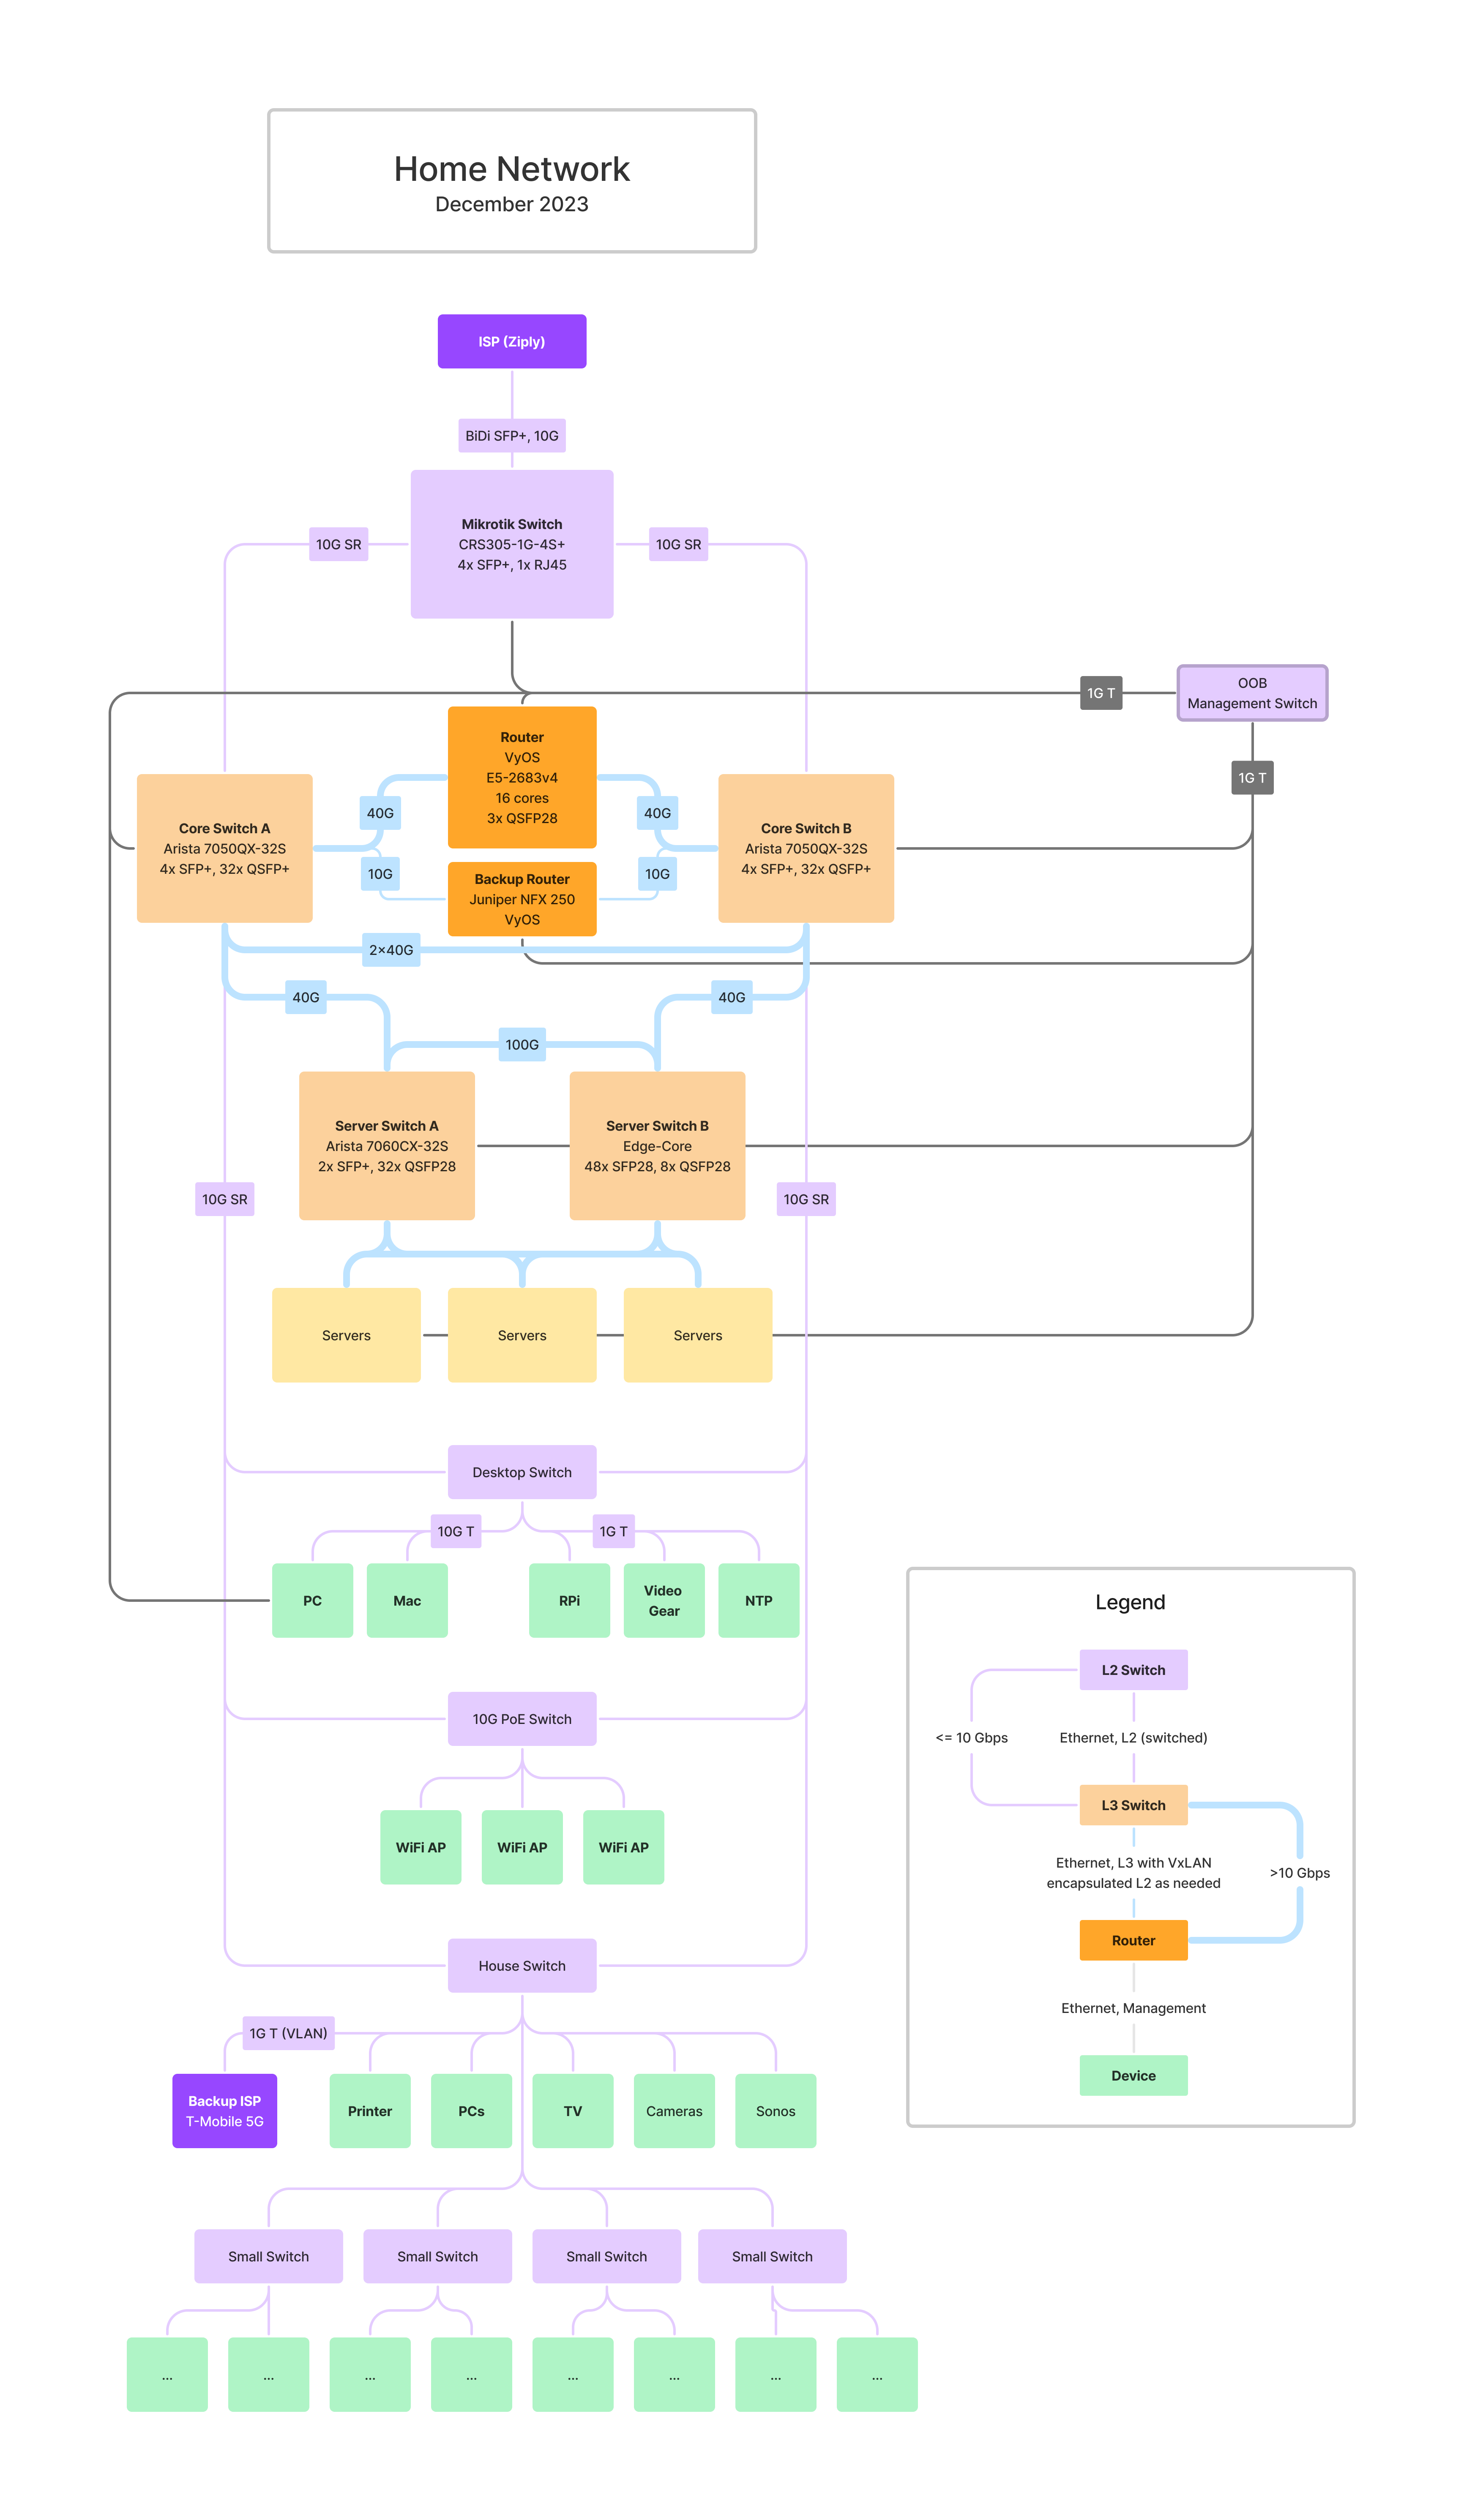
The big changes over the past 18 months:
- I ripped out almost all of the L2 Ethernet switches that comprised the “house” side of my network (as opposed to the “server” side) and dropped a pair of Arista 7050QX-32S switches in instead. The 7050QX is a 32-port 40 GbE switch, which gives me a lot more room than the 8-port 10G switch that used to sit in the middle of things and is fantastically more capable.
- I replaced the mess of L2 10G links between random switches with 2x10G links back to the pair of Arista switches, and moved to using EVPN-VxLAN for connecting L2 network segments together. EVPN-VxLAN is effectively a way of carrying VLANs over UDP, all controlled by BGP.
- I somewhat reluctantly switched back to using VyOS on a PC instead of using Juniper NFX250s for routing.
- I upgraded my home Internet service, now I have 10G to Ziply, up from 1G before. This came with a few interesting side benefits.
Using a Samsung QN700B 8k TV as a Monitor
Long, long ago, I described “my dream monitor” here, in terms of a newly announced (in 2007) 52" 4K TV. My take at the time was that it was maybe a bit big (the corners would be hard to use) and maybe a bit low-DPI, but overall it’d be a great improvement over the 24" 1080P screen I had at the time, although connecting it to a computer would be a bit entertaining.
Over the last decade, I’ve mostly worked on 39"+ monitors. I had a 39" 4K 30 Hz TV (Seiki SE39UY04) (too slow for games, mostly fine for text, but kinda fuzzy), a 43" Dell 4K monitor (nice, but DPI was kinda low and color was meh), and a 40" LG 5120x2180 widescreen (beautiful, but vertically shorter than I wanted).
My “dream” monitor hasn’t actually changed much since 2007: around 50-55" with All The Pixels. I don’t really care if a couple corners are hard to reach–at this scale, there’s no point in maximizing non-game, non-video windows. I don’t think there’s much of a point in going bigger than that, unless you can mount it 4’ or more away. Personally, I’d rather have a relatively large monitor slightly further away, because it’s easier for my eyes to focus.
So, the only thing that’s really changed since 2007 is the understanding that 4k isn’t really a high enough resolution for that big of a monitor. 6k or so would be a minimum, and 8k (or even slightly higher) would be much better.
The problem has been that no one actually sells the monitor that I want. As of 2023, there’s really only one true 8k monitor on the market, a somewhat long-in-the-tooth 32" Dell. There are a few curved >35" gaming monitors with more-than-4k resolution, but they’re all shorter than I want.
There are, however, a bunch of 8k TVs on the market now. Unfortunately, almost all of them are huge. That’s because 8k TVs barely make sense as TVs today, and there’s no market for “tiny” 8k TVs in the US. A couple years ago, Samsung, etc, made 55, 65, and 75" models, but the 55s have mostly vanished.
Except for one: the Samsung QN700B, which is only available from Best Buy in the US. It’s a 55" 8k TV with 4 HDMI 2.1 inputs, and it’s currently selling for under $1,000.
A local Best Buy had an open-box model on sale for around $800, so I decided to give it a shot. Online reviews of people using this as a monitor are split 3 ways:
- It looks horrible, why would anyone want this?
- It’s fine but not great. Maybe too big?
- It’s awesome, but a pain to set up. Once you get it right, though, it’s amazing.
Fundamentally, I think the third group are right. Out of the box, it looks terrible, because it tries to be an overly-smart TV, not a monitor. Finding everything that needs to be disabled is a pain, but once that’s done, it’s nearly perfect. If you don’t set it up just right then you end up with barely-readable text, which is where the “it looks horrible” complaints probably come from.
To make life easier for others, I’m writing this up as a short guide.
Requirements
You really need a video card (or laptop) with HDMI 2.1. This TV is overly picky about settings, and I don’t think there’s any way to get a good image out of it without HDMI 2.1 support. It works fine with a new Macbook Pro M2 Max and also with a PC with a nVidia RTX 4090. It doesn’t work well with an nVidia RTX 2080 Ti with a DP to HDMI 2.1 adapter.
On the Mac front, it looks like an M2 or M3 Pro/Max/Ultra is needed. The base (non-Pro) M2 and M3 don’t support 8k over HDMI, and none of Apple’s specs for the M1 chips list 8k support. An Intel Mac with an AMD eGPU might work but I haven’t tested it yet.
On the PC front, you’re probably fine with any GPU with an HDMI 2.1 port. Those first arrived in the nVidia RTX 30xx and AMD Radeon 6xxx series. I haven’t tested AMD’s cards in Windows.
Make sure that you use a good HDMI cable, 8k pushes a lot of bits down the wire, and older cables almost certainly aren’t up to spec.
Settings
There are four settings that are required to get good text quality on the TV:
- The HDMI input needs to be in ‘PC’ mode
- The TV needs to be in ‘Game’ mode.
- The computer needs to send RGB-format video to the monitor, not TV-format Y* video.
- The computer needs to enable variable refresh rates.
Until all four of these are set, the image is going to look bad, and text will be fuzzy or worse.
Let’s break these down.
PC Mode
The TV needs to think that it’s connected to a PC, or it’ll (apparently) refuse to support RGB mode (below). My PC automatically went into PC mode, but my Mac did not. Changing this is kind of dumb–hit the ‘Home’ button on the TV remote, then go left with the remote, select ‘Connected Devices’, arrow over to your Mac’s HDMI port, arrow down and change the icon to ‘PC’.
Game Mode
Next, the TV has to be in Game Mode. This can be selected using the TV remote. Without this, the TV turns on all sorts of image optimization logic, all of which is terrible for text and mostly can’t be disabled any otherway. Also, it’s a requirement for VRR (below).
Without game mode, the monitor is prone to dithering solid color areas, even in 4k, which makes everything look terrible.
RGB-format video
TVs traditionally expect to see YCbCr (or YBpBr?) color information over HDMI, not RGB. In a lot of cases, the Y* information is subsampled; brightness information is provided per-pixel, but color information is maybe only provided for blocks of 4 pixels. This isn’t a huge deal with video, but it destroys small text. The best way to stop this is to have your computer send RGB color to the screen, not Y* color.
Windows 11 (at least with nVidia) seems to default to RGB, and provides a handy setting for controlling it.
Unfortunately, Macs frequently default to YCbCr with TVs. My 2023 MacBook Pro 16 (M2 Max) running Ventura 13.6 still defaulted to Y*, not RGB. Fortunately, this is relatively easy to fix. You need to edit a plist file and reboot, and it will force your TV to RGB by default.
*Make sure that the TV thinks that it’s connected to a PC (see above), or this may fail silently.
According to Samsung’s e-manual for the QN700B, you can tell if it’s in RGB mode by going into settings / Connection / External Device Manager and trying to change the HDMI black levels setting. They claim that this is only supported in RGB mode. I have never once had this work, however.
Variable Refresh Rate (VRR)
The last thing that is critical is to enable Variable Refresh Rate. This disables yet another optimization on the TV side. You must enable Game mode for this to be available. On the Mac side, this shows up in the Display control panel under “Refresh rate”. Just choose “Variable (48-60 Hertz)”.
On Windows 11 with nVidia, this didn’t become an option until I fired up the nVidia control panel and forced GSync on for the TV. I suspect that AMD cards will Just Work here.
Note: this is where my RTX 2080 Ti fell down: it wouldn’t let me enable VRR, and without VRR the text quality is spotty.
There are a few additional things that you’ll probably want to do. Enable 10-bit color if possible. On Windows, this lives in the nVidia control panel. On the Mac, it seems to be on by default, but it’s not easy to check out of the box.
On the Mac, consider installing BetterDisplay. It gives you more control and visibility, and makes it possible to pick scaling factors that MacOS doens’t provide by default. Out of the box, MacOS Ventura supported 8k (text too small) and 2x scaling (text too big), but nothing in between. BetterDisplay fixes this:
- Enable high resolution HiDPI: Settings -> Displays -> Overview -> “Enable resolutions over 8K (4K HiDPI)”
- Customize available resolutions: Settings -> Displays -> SAMSUNG -> “Enable smooth scaling”, “Add near-native HiDPI resolutoon with smooth scaling”, and others. If you turn everything on, then you’ll end up with a giant list that is kind of a pain. Also, over-4k resolutions tend to be further down the list, so you may need to scroll down to find them.
Windows doesn’t seem to have a similar issue, just a single scaling percentage control, which defaulted to 500% on my system (ha!). I found 150% to 175% looked best, although Windows being Windows a couple apps had minor rendering problems with fractional zoom ratios.
Additional Issues
- It’s a TV. It has a remote, and it doesn’t really want to power on/off the same way that PC monitors do. It’s possible that some of the TV’s power settings will help with this. I haven’t tried yet.
- Sometimes a chunk of my display flickers; usually it’s a vertical segment that covers 1/4 of the screen, just right of the center line. This has happened twice, power-cycling has fixed it both times.
- Sometimes game mode turns itself off when turning the screen on for the day. Suddenly all text looks horrible. Just turn it back on.
- It’s enormous and heavy. Yep. Can’t help much there. I have mine mounted to a framework made of 80-20 aluminum extrusion. I had a mounting plate custom-cut that screws into the extrusion and has the right mounting holes for the 400x300mm mounting pattern on the monitor. Then I adjusted it so that the monitor is sitting ~1 cm above my desk. That puts my eyeline pretty close to the midline of the screen. I’m sure that someone makes an adjustable monitor arm that can hold this thing, but I don’t know who and I doubt that I’d be happy paying for it. I don’t want to adjust it, anyway. I just want to put it in the right place and leave it alone.
- The TV supports HDR, but generally having HDR turned on for desktop use is counterproductive. Both OSes do a poor job of mapping “normal” sRGB-ish colors into HDR’s color space, which leaves things looking washed out.
- It also supports 4k at 120Hz. I’ve never really played games at over 60Hz before, and it’s not a high priority for me, but it seems to work. The one game that I’ve tried at 120Hz (Cyberpunk 2077) actually had a harder time getting ~120 FPS in 4k than it did getting 60 Hz in 8k, and vsync was weird at 120Hz. But I’m sure that’s managable with a few extra minutes’ work.
Update history
- 2023-11-20: Verified that the specs for Apple M3 Pro/Max should work, and clarified M1 wording.
- 2023-11-20: Added “PC mode” to the list of required settings.
Pricing for Hugo on Google Cloud
As I mentioned a week and a half ago, I’ve shifted this blog from being self-hosted to living on Google Cloud, because I didn’t want to spend time maintaining a web-serving infrastructure at home.
Obviously, there were many ways that I could have solved this problem. I decided on Google Cloud for a couple simple reasons. First, I work for them, but have very little experience as a customer (anti-disclaimer: I pay retail prices without a discount). Second, I already have an account and billing set up, even though all I’ve really been using it for is DNS hosting. And third, it looked about as simple as any of my options.
My one concern was cost. Almost nothing in Google Cloud (or Amazon, or Azure, or anyone else) is free. The full price list is available, which is nice, but it’s hard to figure out exactly what this was going to end up costing me. I’ve only been paying a few dollars per month for Google Cloud DNS hosting. I figured my price would go up, but there were too many unknowns to be able to figure it out from the price list alone. I was expecting Netflix-ish monthly prices (spoiler: yep), and knew that I wasn’t going to end up with a giant bill, but beyond that it was a bit of a mystery.
So, it’s been over a week since the last change now, and the daily billing numbers from Google Cloud are pretty steady. I’m going to give prices in US$ per week, just because I have a week’s worth of actual data. The bulk of the bill is for Cloud Load Balancing, which is costing me $4.20/week. Beyond that, the numbers are tiny. I splurged for Google’s CDN when setting this up; the last week has cost $0.19 in CDN bandwidth and $0.12 in CDN lookups. My Cloud Storage bill for the whole blog, including images, is a whopping $0.01 for the past week. A bit under $20/month in total.
These numbers will vary with load, of course. The Load Balancing bill is (unfortunately) just the minimum charge for having a load balancer at all. The Cloud Storage bill is proportional to the total size of your content. And the network numbers will obviously go up with traffic. Of which I have approximately none. Adding 10x as much traffic would probably cost me an extra $2/month.
So far, I’m reasonably happy. It took me an hour or so to set up,
including SSL (using an auto-generated SSL cert, presumably from Let’s
Encrypt), redirections from HTTP to HTTPS, redirections from
www.scottstuff.net to scottstuff.net, and a redirection from an
ancient RSS URL to the current version. Could I do this for less
money? Absolutely. Could I do this, on my own domain, with
auto-managed SSL certs, with custom redirect rules, via IPv4 and IPv6,
via a global CDN, with monitoring, for less effort and less money?
Probably, but not a whole lot less work or much less money.
SAS counters on linux
There isn’t a lot of documentation on debugging SAS-specific storage problems under Linux, unfortunately. I’ve had a couple issue recently that were tied to flaky SAS cables and mostly had to debug them through swapping cables and logic to figure out which device was causing issues. Along the way I’ve learned a few helpful things.
First, Linux actually has counters for tracking SAS-level problems. They’re just really hard to find, and very few tools expose them. The kernel would love to tell you that the connection between your SAS expander and drive 23 is flaky, but it’s not really going to go out of its way to tell you. You need to go looking for it.
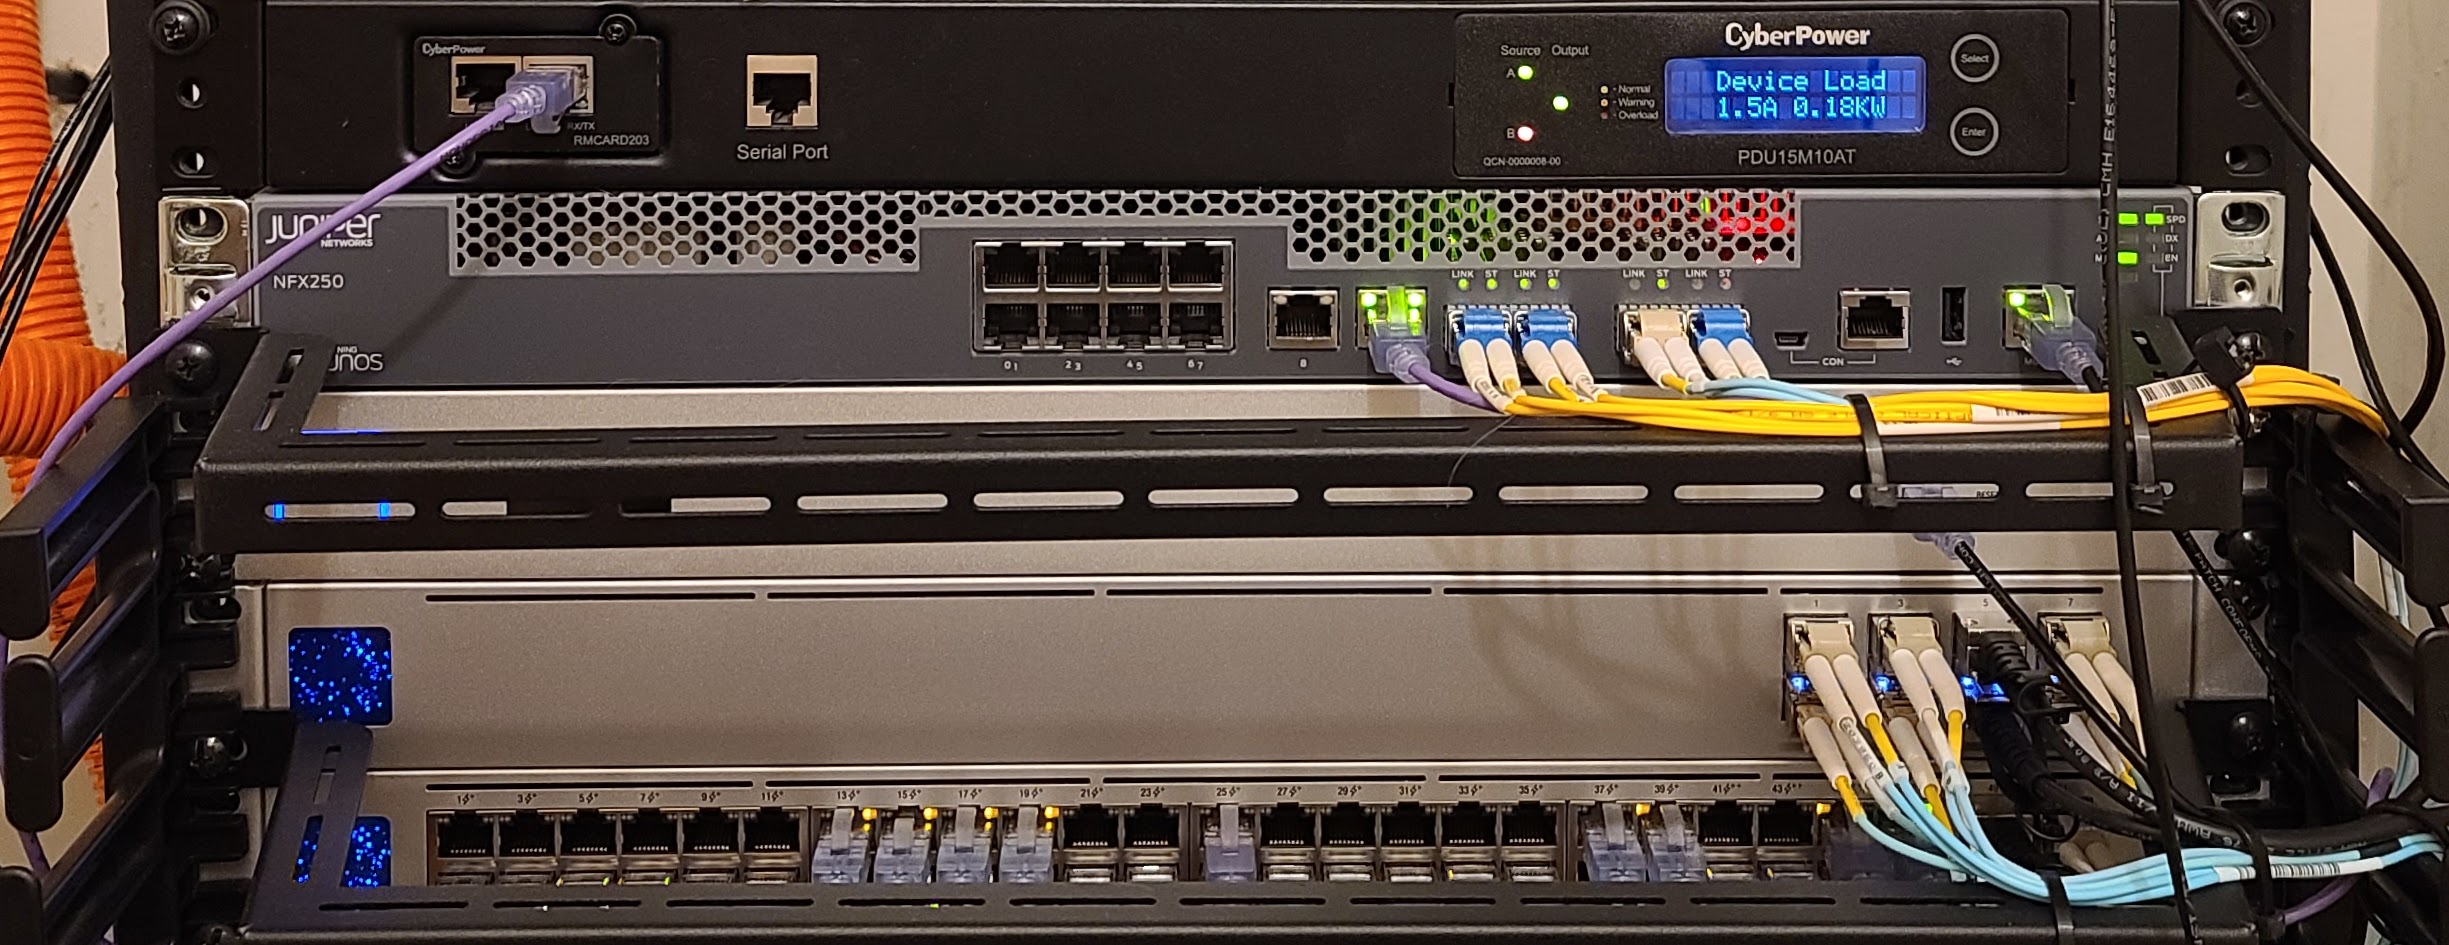
Juniper NFX250, part 1
As mentioned earlier, I’ve been playing with using a Juniper NFX250 as a backup home router for the past month or two. The NFX line (and the NFX250 specifically) is kind of a weird beast. It has most of the capabilities of an SRX, while adding the ability to run high-bandwidth virtual machines directly on the router. It looks like it’s supposed to sort of sit next to the SRX1500 or maybe SRX380 in Juniper’s lineup, while being much cheaper than either. The NFX250 lists for $4,700–$8,500 depending on the configuration, vs $11,000 for the SRX1500 or $14,295 for the SRX380. At those prices, none of these would make a very interesting home router, much less a home backup router. What makes the NFX250 interesting to me is that it’s available on eBay, frequently for under $400. That’s not too shabby for a 2x10GbE + 12xGbE router that can supposedly handle around 10 Gbps of traffic.
In fact, the Juniper MX150 is really the same hardware with different software; Juniper claims that it’s good for 20 Gbps.
Under the hood, the NFX250 is mostly just a PC with a Xeon-D 15xx CPU. The NFX250-S1, -S1E, and S2 have a 6-core CPU, while the down-specced NFX250-LS1 only has 4 cores. Other than that, the only difference between the models is the amount of RAM and SSD included. Since the NFX250 uses DDR4 RAM and M.2 2260 SATA SSDs, it’s not particularly difficult or expensive to upgrade any of the models beyond the NFX250-S2 spec of 32GB RAM/400 GB SSD, if you need it.
Note that I said “mostly just a PC” above; the entertaining thing about the NFX250 (and, frankly, the most frustrating part about it) is all of the front panel Ethernet ports (except the management port) are actually connected to a managed Ethernet switch chip, and the switch chip is then wired into the PC inside with 2x10GbE links.
The NFX250 runs Linux, and dumps both internal 10GbE interfaces into a software switch (OVS, specifically). Then the NFX software lets you run VMs and connect them to the software switch in various ways. Managment of the NFX is done via a Junos VM that provides pretty much all of the abilities of a Juniper SRX. By and large, you wouldn’t know that you’re talking to a FreeBSD/Junos VM on top of Linux, right up to the point where you start trying to configure interfaces. Then things get strange.
The front panel interfaces are named ge-0/0/0 through ge-0/0/11
plus xe-0/0/12 and xe-0/0/13, following Juniper’s usual naming
conventions.
If this was an SRX and you wanted to assign an IP address of
1.1.1.1/24 to ge-0/0/0, then you’d just run something like
> set interfaces ge-0/0/0 unit 0 family inet address 1.1.1.1/24
With the NFX, you rapidly discover that family inet isn’t supported
on any of the internal interfaces. Only family ethernet-switching.
So how do you use this as a router? Easy… ish.
> set vlans my-vlan vlan-id 100
> set interfaces ge-0/0/0 unit 0 interface-mode access
> set interfaces ge-0/0/0 unit 0 family ethernet-switching vlan members my-vlan
> set interfaces sxe-0/0/0 unit 0 family ethernet-switching vlan members my-vlan
> set interfaces ge-1/0/0 vlan-tagging
> set interfaces ge-1/0/0 unit 100 vlan-id 100
> set interfaces ge-1/0/0 unit 100 family inet address 1.1.1.1/24
In short, you need to create a VLAN, map your ge-0/0/x port onto
that VLAN, make sure that sxe-0/0/0 includes the VLAN as well, and
then add a new unit to ge-1/0/0 to handle that VLAN’s traffic.
Where does ge-1/0/0 come from? It’s a purely virtual beast that
hides inside of the NFX250. Entertainingly, even though Junos calls
it ge-1/0/0 (which implies that it’s a regular Gigabit Ethernet
port), show interface ge-1/0/0 thinks that it’s really a 10GbE link
(which Junos usually calls xe-x/x/x, not ge-x/x/x). A
half-duplex 10G link, for some reason:
> show interfaces ge-1/0/0
Physical interface: ge-1/0/0, Enabled, Physical link is Up
  Interface index: 170, SNMP ifIndex: 540
  Link-level type: Ethernet, ... Link-mode: Half-duplex, Speed: 10Gbps, ...
  ...
Whatever, it’s virtual.
This all seems less odd if you realize that it’s really just a
“Router On A
Stick”
config internally. If you’d like a more traditional Router On A Stick
setup, then Junos will happily let you set up VLAN trunks (... family ethernet-switching interface-mode trunk) and share VLANs across
interfaces just like a perfectly normal L2 switch.
In Part 2, I’ll jump into some of the weirdness around NFXs, where they behave differently from SRXes. Then I’ll move on to discuss Virtual Network Functions, which is why Juniper made NFXes weird.
Useful links:
Routers I Have Known
Let’s just agree on this up front: my home network is overly complicated. There’s a nice, boring LAN with WiFi APs and TVs and Playstations and so forth. There are family members trying to conduct business and school and social lives, and they mostly depend on things working.
And then… let’s call it The Dark Side of the Network. Where things get complicated. Where servers live and talk OSPF to multiple L3 switches, so everything keeps working even when I reboot a switch or move cables. Where service IP addresses are announced from multiple servers via BGP, and fail over when servers go down. Where there are redundant WAN links and redundant routers, and things get messy. To put a more acceptable spin on it, let’s call it “lab space.”
Reviving
Another year, another lack of updates.
I’ve been running this site on a computer in my garage, but keeping it up and running hasn’t been a priority to me, and were too many moving parts to actually keep it stable without work. So I’ve punted and moved the serving part of this to Google Cloud, and updated Hugo to be current along the way.
I’ve had a number of entertaining network adventures over the past couple years, and they’re really too long for Twitter, so I’ll be adding them here as time allows.
Linux on a Beckhoff CX5020
This is likely of no use to anyone but me, ever, but I’ll post it anyway. I’m trying to install Linux on a 10-year old Beckhoff CX5020 industrial computer, and everything works fine until about somewhere in the middle of the user-mode startup process when the screen goes blank and never comes back. I tried disabling X and that didn’t matter. Even booting in single-user mode didn’t help. It still went blank while booting. I could SSH in over the network to debug, but couldn’t get a working monitor.
The problem seems to be the Kernel’s video driver mis-understanding
the number and/or type of video ports that the CX5020 has. The
solution is easy: add the video=LVDS-1:d option to the kernel’s
command line. After that everything seems to work fine. It boots up
and runs X as well as could be expected for a 10 year old compact PC.
Which is to say not tremendously quickly.
Measuring Backlash, Part 2
(See part 1 for the beginning of the process)
Yesterday, I set out to measure backlash in the Z axis of Beaver HDZero CNC. I concluded that it had about 15 microns (0.015mm, or roughly 0.0005") of backlash in the Z axis.
Today I’m going to measure the X and Y axes. They’re each a bit different:
- They use larger ballscrews than the Z axis (1610 vs 1605) with twice the pitch. That means that one turn of the stepper motor goes twice as far. A single step should be 12.5 microns, and the stepper’s encoder should be able to measure about 5 microns.
- The Y axis has a pair of steppers driven in parallel, one on either side of the gantry. In theory, there’s no reason why this should matter, but I could see extra inaccuracy creeping in.
- I had a difficult time getting the ball nuts assembled correctly when building this; I repacked each of the Y nuts at least once, but the X nut seemed to work okay so I didn’t repack it. It lost at least a few ball bearings, though, so I probably should have repacked it. We’ll see if that matters.
The process here is exactly the same as the Z axis from yesterday. I fed the CNC a program that tells it to move from 0 to 0.200 mm, in 0.003mm steps. It paused after each step so I could take a measurement using a Mitutoyo 543-302b digital dial indicator. The dial indicator is accurate to 3 microns, which is why I’m moving the CNC in 0.003mm steps. The dial indicator is wired into my laptop via Mitutoyo’s USB cable. The cable makes the indicator act like a USB keyboard; every time I press the button in the middle of the USB cable it “types” the current measurement into the computer.
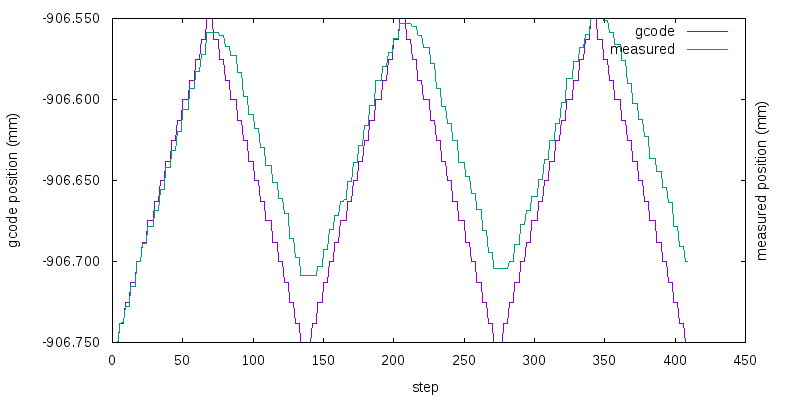
Here’s the Y axis’s motion:
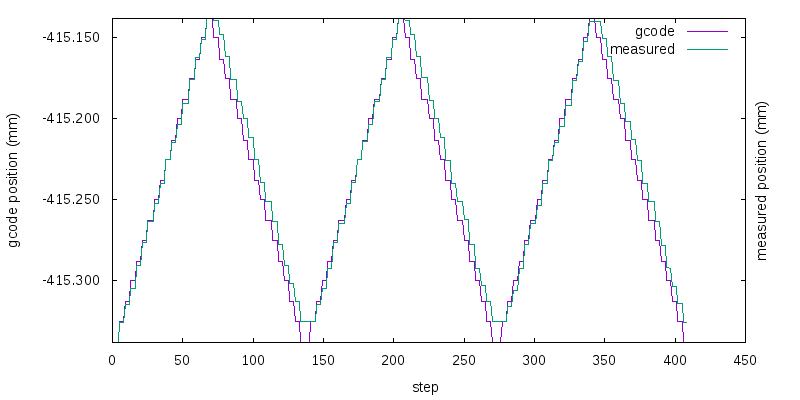
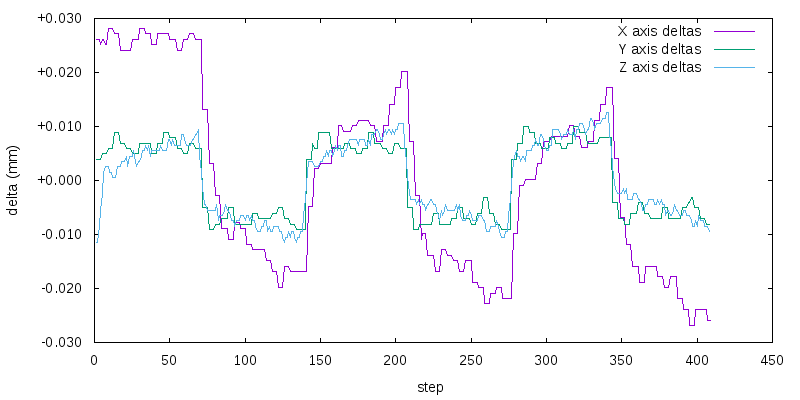
Compared to the Z axis from yesterday, the “stairsteps” on this are very pronounced, as expected. Comparing the delta between the two lines gives this:
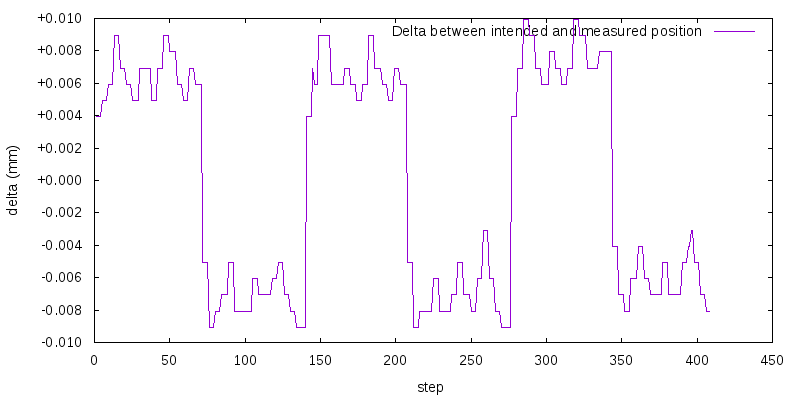
This looks like around 15 microns of backlash again, very similar to the Z axis.
Now, on to the X axis. It’s a bit more interesting.
Notice that it moved differently on the first vs second and third iterations?
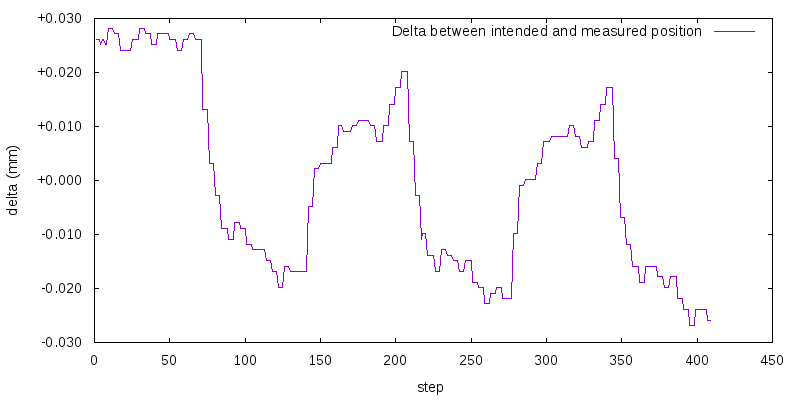
Uhm, yeah. There’s way more backlash, and it seems to have been drifting at least a bit over time. Repacking that ball nut would probably be a good idea.
Here are all three axes on one graph; it makes it clearer that Y and Z are very similar, but X is an outlier.